VirtualDubMod - What it is and how to use itMany of you will be familiar with this program already and many more of you will be familiar with its parent, VirtualDub. VirtualDubMod is (in case you hadn't guessed) a modified version of VirtualDub with all sorts of extra features added. This guide will start with the presumption that you have no idea what either of these programs are or do and then go into detail about how to use VirtualDubMod. What's it for? VirtualDub was developed by Avery Lee as a general purpose tool to access Video for Windows in order to Capture, Encode and Decode video footage. Its quality, simplicity and efficiency make it invaluable for both capture and encoding video footage in Windows. VirtualDub was designed for using avi containers to store the video it captures or encodes but VirtualDubMod has extended this so that you can create files in Matroska and Ogg Media containers. It is the avi facilities we will be using for most of the guide. This guide looks at the following parts of this program. You should read them all but for ease the following links will take you to that section: Basic OperationsOpening Video Files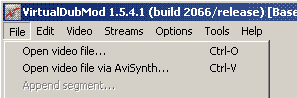 The first thing any traditional VirtualDub user
will notice is that VirtualDubMod has two different "Open video file"
options in the File menu. These behave in very different ways
so let's have a look at what they do:
Open video file... 'Ctrl-O' This is used for opening all kinds of video files: .avi, .avs, .ogm, .mkv, mpeg1, mpeg2 and so on. The same functionality can be achieved by dragging and dropping a video file from a folder directly into the VirtualDubMod window. Open video file via Avisynth... 'Ctrl-V' This is NOT for opening avisynth files, it is for creating them. If you just want to load an avs file you have already made then use the regular Open video file option. Open video file via Avisynth allows you to chose a video file and VirtualDubMod will create an avisynth script using a Template of your choice (see the pull-down menu). The templates listed are: Default (AVI Source) - This will create a script with AVISource("C:\YourVideo.avi") and load it. You must remember to choose the correct template when using this option - VirtualDubMod is not intuitive and will not select the correct one for you. Loading an avi with MPEG2Source will not work and vice versa. Scrubbing the file and selecting areas When you have a file loaded into VirtualDubMod, you can use the bar and buttons at the bottom of the window to do a variety of things. Here's a version with some red alphanumeric labels so I can talk about the different functions.  A) This is the Trackbar which you can click and drag to see different parts of the video.There is also a status display to the right of the control buttons, the image above tells us: 'Frame 85' - the frame number being displayed currentlyAll pretty straightforward stuff. Now that you know how to scrub the video file and set start and end points let's have a look at how you would export video in different ways. The Video Menu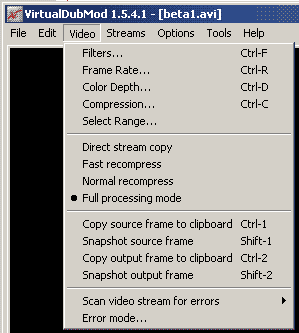 The
Video menu is where you set all the options for video processing. The
Video menu is where you set all the options for video processing.Filters... This is where you can choose different things to alter the way your video looks such as resizing and so on. However, all of these things are done much much better in Avisynth. Using this guide you will never use these options - they only operate in RGB32 which is not always what we want. Frame Rate... This is another option you will never want to use. Firstly the VirtualDub framerate setting isn't very sensible or stable, so it shouldn't be used. If you want to do any frame rate changing you should use Avisynth or AVIfrate which comes in the AMVapp. Color Depth... This just sets what bit depth will be displayed during decoding. The defaults are fine Compression... Aha! This is an option you will use a lot. This is where you set the Video Compressor you want to use when saving the file. This can be any Video for Windows compressor that is installed - the ones that will be used mostly in this guide will be HuffYUV, PicVideo Mjpeg and XviD. Select Range... This does the same thing that you can do by scrubbing the Trackbar and setting the Start and End. It's useful if you know exact frame numbers. Direct Stream Copy - This will take the input video and copy it exactly to an output. This is very useful for extracting sections of avi file. When setting a section to extract you should select keyframes otherwise the exported section may not play back. Fast recompress - This is the option we will always use for compression. It takes the input video and send it to the Compressor without doing any conversion. As we will almost always use avisynth to process the video we can guarantee it is ready to be sent straight to the compressor. Normal recompress - This converts the footage to RGB and then sends it to the compressor. Colorspace changes should always be avoided if possible - not recommended. Full processing mode - This converts the footage to RGB, applies any internal VirtualDub-style filters and send the video to the compressor. Again any processing should be done in Avisynth for quality reasons, so this option will rarely be used if ever. Copy/snapshot source/output frame - allows you to take the source or output frame and either copy it to clipboard or save it to a file (lossless file types are supported by default). Scan video stream for errors - This means errors such as corrupted data and you'll probably never need to use it. If you do, you'll probably want to read the help files (press F1) as there's lots to learn about the way virtualdub can deal with corrupt video streams. Error mode... This allows you to choose how virtualdub will report errors. Default is fine. OK that should do as an overview of the video options. Before looking at ways to export the video you process in VirtualDubMod you will probably want to know where the audio options are. Setting the Audio - The Streams MenuThis is the main thing that confuses traditional VirtualDub users. VirtualDubMod has a completely different way of dealing with audio which works in a way which is much more useful for people producing files in containers which can hold all sorts of video, audio and subtitle data. For avi users this extra level of sophistication isn't vastly useful, but there are nonetheless some very useful things offered by the new way of doing things, once you know how they work.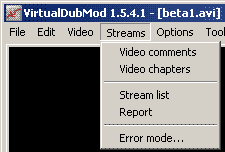 Video
comments - This allows you to add things like *ahem* copyright
information and other such data to your video file when exporting. Video
comments - This allows you to add things like *ahem* copyright
information and other such data to your video file when exporting.Video chapters - this only works for OGM and MKV streams. Allows you to set chapter information so people can skip to specific points in a file. Not much use for individual amvs but could be handy for projects with lots of different videos. Stream list - THIS is where all the audio stuff has been hidden. We will have a closer look at this in a moment. Report - this will display a little text dump of the streams that are going to be contained in your export. Error mode... identical to the video error mode options. To find the audio settings you will need to select Stream list. Inside you will get a menu dedicated to audio and subtitle streams. The 'Stream list' menu 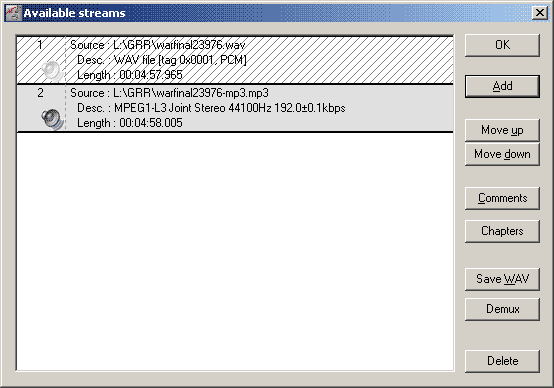 There's all sorts of things in this menu so let me explain what you can see here. In this image, there are two audio streams - a WAV stream and an MP3 Stream. The WAV stream has been disabled (which is why it is checked with grey lines). If I exported a video with this stream list then I would get the second stream (the mp3 stream). I can also deselect the speaker icon which means the stream is not previewed in when playing in VirtualDubMod but it will still be exported. Multiple audio streams are supported by all containers one way or another but will not be of great use to you as an amv creator. If you want to use these options you should read up on multiple audio streams as they sometimes need extra things installed for people to select which stream to hear. Comments and Chapters - these are duplicates of the menu you saw before except you can put comments on the individual streams. Traditional VirtualDub users may be wondering where the audio processing options are. Fear not. By right-clicking a stream you will bring up a menu that looks just like the old VirtualDub audio menu: 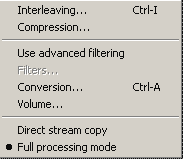 Interleaving... This
will allow you to set how your audio will be 'joined' to the video.
Audio is separated and processed in frames just like video and for
playback it is best if they are interleaved. You can check out the
interleaving option but the default setting of 1 frame is fine for
this. This also allows you to set any audio offset but with amvs it is
unlikely that your audio will need to be offset to sync with the video,
if edited correctly. Interleaving... This
will allow you to set how your audio will be 'joined' to the video.
Audio is separated and processed in frames just like video and for
playback it is best if they are interleaved. You can check out the
interleaving option but the default setting of 1 frame is fine for
this. This also allows you to set any audio offset but with amvs it is
unlikely that your audio will need to be offset to sync with the video,
if edited correctly.Compression... This allows you to use ACM audio compression codecs. The only one you will even want to consider is 'Lame MP3' - this will be covered later when we look at audio compression. Use advanced filtering - virtualdub now has options to do interesting things with audio such as Pitch shift, Gain, Chorus effects and so on. It's unlikely you will use them but they are fun to play with. If you select this option the Filters... option will become available to you. It works just like the video filters where you add audio filters one after another and choose their options. Conversion... This is a simplified version of the filtering which does things like convert the sample rate of an audio stream. It is very unlikely that you will want to do this as things like stereo, sample rate, audio bit depth and so on should be kept as they were originally unless you have some particular reason to force a change. Volume... Straightforward this one, boosts the audio relative to the current audio level. This can cause clipping however and is not as useful as normalisation, which we will discuss in the audio guides. Direct Stream Copy - This will not process the input audio stream, it will just copy it as it. Useful. Full processing mode - will convert the audio stream to wav, process it using any selected filters and then compress it using the ACM compressor chosen in the Compression menu. We will look at this in the audio encoding section. We will return to these features when it comes to compressing audio but it should be clearer now how you use this section for adding and removing audio streams. Avisynth Processing
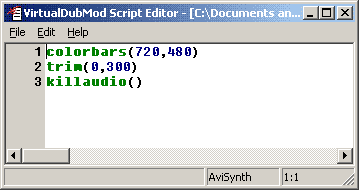
This is, in my opinion, VirtualDubMod's most useful function and the
main reason for its inclusion in the AMVapp. We've had a look at how
you use Avisynth and I'm sure it seemed like an arduous chore to create
these text files, load them up, look at them, go back and edit them,
load them again.... Arduous no more. VirtualDubMod has a sophisticated Avisynth
Script Editor that you can use to edit and see the changes in your
avisynth scripts instantly. |
 The Avisynth
editor is a simple text editor but it has some very nice features,
especially in the way it intergrates with VirtualDubMod.
The Avisynth
editor is a simple text editor but it has some very nice features,
especially in the way it intergrates with VirtualDubMod.