AnimeMusicVideos.org > Guide Index
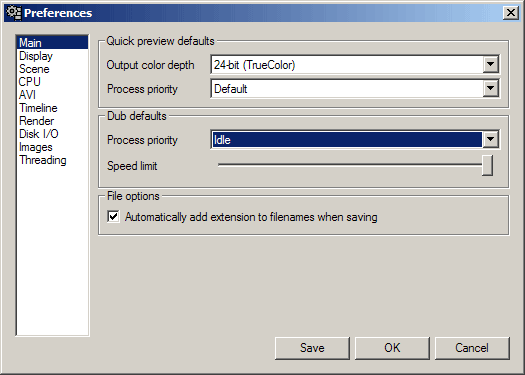
VirtualDub - What it is and how to use itWhat's it for? VirtualDub was developed by Avery Lee as a general purpose tool to access Video for Windows in order to Capture, Encode and Decode video footage. Its quality, simplicity and efficiency make it invaluable for both capture and encoding video footage in Windows. This guide looks at the following parts of this program. You should read them all but for ease the following links will take you to that section: Basic OperationsPreferencesBefore we even get started, I would like to cover a few options that you will want to change. With VirtualDub open, go to the Options menu, and then choose Preferences.
The first thing that you see here should be the Output Color Depth setting, which is set at "Fastest (16bit)" by default. I highly recommend changing this setting to 24bit (TrueColor). This is because when viewing your video in VirtualDub, you will usually want to see the EXACT video quality that the file contains. If set to Fastest, then not all colors are displayed and it makes your video look worse than it actually is. Next, you may want to adjust the Process Priority setting under "Dub Defaults". At the default setting of "Normal", your PC may function slowly if you are trying to do other things such as surf the web while you wait on VirtualDub to encode your video. If you don't plan to use your computer while encoding, then that is fine. But otherwise you might want to change the process priority to a lower value. The lowest setting is "Idle" which means that VirtualDub will only use any processing power thats not being used up by other programs that you are currently running. Depending on your computer setup, the option that you want to select may vary. I would recommend NEVER setting it higher than normal though. To save your settings now, just click on the Save button, and then click OK. Those are the only preferences we will look at for now. You can look through the rest of them if you want, but you should not change anything unless you are sure you know what you are doing! Opening Video Files You can open a video file by going to the File menu, and selecting Open Video File..., or alternatively, you can simply press ctrl+O. While VirtualDub is primarily designed for working with AVI files, it can handle a few other types of videos as well, such as .mpg or .divx files. File types that are not supported by VirtualDub can be supported by piping them through AviSynth, which will be discussed later. Scrubbing the file and selecting areas When you have a file loaded into VirtualDubMod, you can use the bar and buttons at the bottom of the window to do a variety of things. Here's a version with some red alphanumeric labels so I can talk about the different functions.  A) This is the Trackbar which you can click and drag to see different parts of the video.There is also a status display to the right of the control buttons, the image above tells us: 'Frame 36244' - the frame number being displayed currentlyAll pretty straightforward stuff. Now that you know how to scrub the video file and set start and end points let's have a look at how you would export video in different ways. The Video Menu The
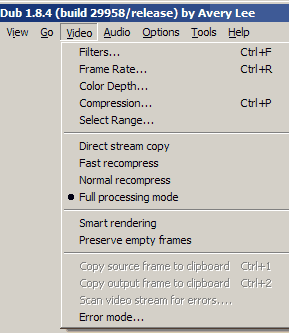
Video menu is where you set all the options for video processing. The
Video menu is where you set all the options for video processing.Filters... This is where you can choose different things to alter the way your video looks such as resizing and so on. However, all of these things are done much much better in AviSynth. Using this guide you will never use these options. It is worth noting that while in the past, all filters required a conversion to RGB32, many of VirtualDubs filters can now work in YUV colorspaces, however it can require some . Frame Rate... This is another option you will never want to use. Firstly the VirtualDub framerate setting isn't very sensible or stable, so it shouldn't be used. If you want to do any frame rate changing you should use AviSynth or AVIfrate which comes in the AMVapp. Color Depth... Let's you select the colorspaces used to decompress and output the video. You typically shouldn't ever need to mess with this, but a thorough explanation can be found in VirtualDubs help file. Compression... Aha! This is an option you will use a lot. This is where you set the Video Compressor you want to use when saving the file. This can be any Video for Windows compressor that is installed - the ones that will be used mostly in this guide will be Lagarith, HuffYUV, and XviD. Select Range... This does the same thing that you can do by scrubbing the Trackbar and setting the Start and End. It's useful if you know exact frame numbers. Direct Stream Copy - This will take the input video and copy it exactly to an output. This is very useful for extracting sections of avi file. When setting a section to extract you should select keyframes otherwise the exported section may not play back. Fast recompress - This is the option we will always use for compression. It takes the input video and send it to the Compressor without doing any conversion. As we will almost always use avisynth to process the video we can guarantee it is ready to be sent straight to the compressor. Normal recompress - This converts the footage to RGB and then sends it to the compressor*. Colorspace changes should always be avoided if possible - not recommended. Full processing mode - This converts the footage to RGB, applies any internal VirtualDub-style filters and send the video to the compressor*. Again any processing should be done in Avisynth for quality reasons, so this option will rarely be used if ever. * Normal Recompress and Full Processing mode will actually convert the colorspace based on the settings you have selected in the "Color Depth..." settings. It is technically possible to use Normal Recompress or Full Processing Mode and even apply some of VirtualDub's video filters wihout doing any colorspace conversion, but you must explicitly set the colorspaces properly. Because this can be a bit tricky, and no warning is given if a colorspace conversion actually occurs, you are best off just using Fast Recompress instead. Smart Rendering - If you only modify a small part of the video, VirtualDub will try to use DirectStreamCopy wherever possible, and only recompress the parts that were modified. Could be handy in some situations, but you will probably never need this. Preserve Empty Frames - You should never need to modify this. Copy source/output frame - allows you to take the source or output frame and copy it to the clipboard. You can then paste it into an image editing program. Scan video stream for errors - This means errors such as corrupted data and you'll probably never need to use it. If you do, you'll probably want to read the help files (press F1) as there's lots to learn about the way virtualdub can deal with corrupt video streams. Error mode... This allows you to choose how virtualdub will report errors. Default is fine. OK that should do as an overview of the video options. Before looking at ways to export the video you process in VirtualDub you will probably want to know where the audio options are. The Audio Menu Interleaving... This
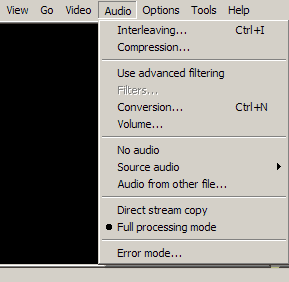
will allow you to set how your audio will be 'joined' to the video.
Audio is separated and processed in frames just like video and for
playback it is best if they are interleaved. You can check out the
interleaving option but the default setting of 1 frame is fine for
this. This also allows you to set any audio offset but with amvs it is
unlikely that your audio will need to be offset to sync with the video,
if edited correctly.
Interleaving... This
will allow you to set how your audio will be 'joined' to the video.
Audio is separated and processed in frames just like video and for
playback it is best if they are interleaved. You can check out the
interleaving option but the default setting of 1 frame is fine for
this. This also allows you to set any audio offset but with amvs it is
unlikely that your audio will need to be offset to sync with the video,
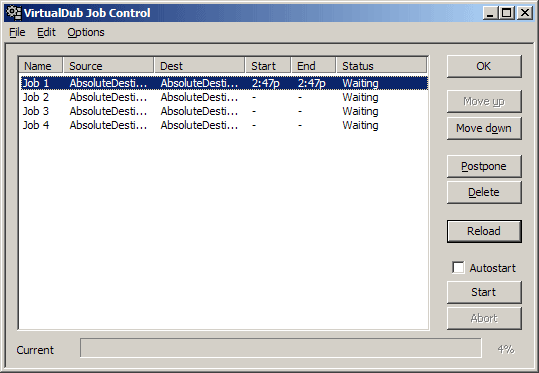
if edited correctly.Compression... This allows you to use ACM audio compression codecs. The only one you will even want to consider is 'Lame MP3' - this will be covered later when we look at audio compression. Use advanced filtering - virtualdub now has options to do interesting things with audio such as Pitch shift, Gain, Chorus effects and so on. It's unlikely you will use them but they are fun to play with. If you select this option the Filters... option will become available to you. It works just like the video filters where you add audio filters one after another and choose their options. Conversion... This is a simplified version of the filtering which does things like convert the sample rate of an audio stream. It is very unlikely that you will want to do this as things like stereo, sample rate, audio bit depth and so on should be kept as they were originally unless you have some particular reason to force a change. Volume... Straightforward this one, boosts the audio relative to the current audio level. This can cause clipping however and is not as useful as normalization, which we will discuss in the audio guides. No Audio - This will disable audio. Source Audio - It is posible for some files to contain more than one audio stream. You can select which one to use here. Audio from other file... - This allows you to use audio from a seperate file, such as an mp3. Useful. Direct Stream Copy - This will not process the input audio stream, it will just copy it as is. Full processing mode - will convert the audio stream to wav, process it using any selected filters and then compress it using the ACM compressor chosen in the Compression menu. We will look at this in the audio encoding section. Exporting VideoThis is the easy part. When you have your source looking the way it should be, your video and audio options set, then you are ready to export a video. To do this, all you have to do is go to the File menu, choose Save As AVI and save the file where you want.One final option is Job Control. You will notice that there is an check box that says: "Don't run this job now, add it to job control so I can run it in batch mode." When you do this, instead of saving the file it will, as it says, add the command to Job Control. You can then set up more exports and add them to Job Control so you can run them all in one go later. This is especially useful if you are making clips from a dvd source as you can keep adding them to job control and then encode them all in one go. Job control can be accessed from the File menu or by pressing F4. Job Control  Most of the Job Control is
self-explanatory. Start and Abort will
tell the batch processing to Start or Abort. Postpone
will set something to postponed so it won't be processed this
time - pressing postponed again will reset it to Waiting.
You can save job lists in the File menu in order to load them later and in the Options menu you can choose an option to have your system shutdown when all the jobs are finished. Possibly the best function of Job Control can be found in the Edit menu and is called Process Directory... If you have VirtualDub set up to compress in a particular way and then go to the Job Control, you can select a Directory in which you will convert every file in that directory using the options you have set. After selecting the source directory it will ask for your output directory for the new files to be saved. This is really great if you have a bunch of avs files that you want to convert. One word of warning is that it will select every file, so you may get a whole bunch of things that are not video files that you do not want to convert. You can Delete these from the list manually or make a new folder for all the files you want converting and another for the converted files. A very useful tool, I'm sure you agree. I think that's about all for the VirtualDub info. There are many other features of this program to explore including the Capturing features and other settings. Some of these we will look at later in the guide and others you can investigate yourself to see if they are of any use to you. It's an essential tool for any Windows video user so I hope this has given you a decent idea about how it works.
|
