AnimeMusicVideos.org > Guide Index
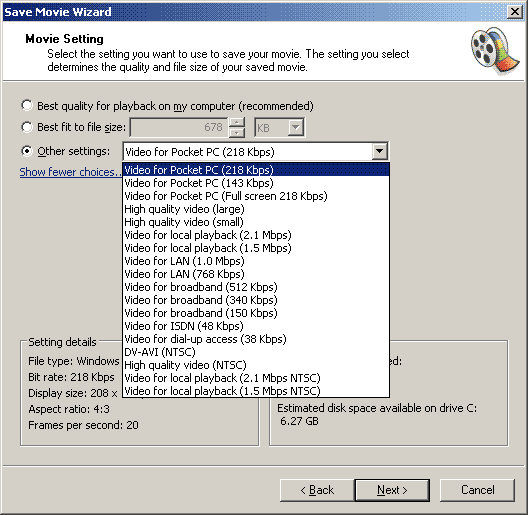
Exporting Video from Windows Movie Maker 2Again the limitations of Windows Movie Maker 2 present themselves in their export modes. If WMM2 would allow Video for Window exporting then all would be good in the world. However, this is not the case, so we have to make do with what sparse choices we have.To export you movie from Windows Movie Maker 2, you need to use the Save Movie Wizard. One thing which is very very important, as I've seen this happen before, is that you need to make a video. The project file that you save when making the video is useless to anyone but yourself. I've seen movie maker project files being hosted on the org by people who didn't upload the right file. Please use the Save Movie Wizard. When you do, you will first be asked the name of the file and the location to save. Put in something appropriate. You will eventually get to a page that looks like this where you should choose Other Settings:  The Export Options
There are only two options you would ever want to choose and there is only one option I recommend. The bad option: You can choose to export "Video for local playback (2.1 Mbps NTSC)" to make the best .wmv encode that Windows Movie Maker 2 can export. This, in my opinion, is totally sub standard, however, and should only be touched if you really don't care how it turns out as long as people can see it. The better option: Choose DV-AVI (NTSC) [or DV-AVI (PAL) if you are editing PAL.] This will output a DV file. It is lossy, you will lose some quality, so not as good an export option as Huffyuv is in other programs but this is the best WMV2 can do, so you should always use this option if you can. DV is much bigger than the standard wmv file so you'll need a gig or so for your whole video. HOWEVER, DV exporting is not in any way perfect with wmm2. It seems that some video filters (such as speedup filters) will not be applied correctly if you export DV and this could severely mess up your video. If this happens, then you may have to just try and use a high quality WMV option :( Using the DV file:Microsoft DV is an ok codec, but it has its drawbacks. One of them is that it is a Direct Show codec, which means it cannot be loaded into virtualdub. However, it can be loaded into AVIsynth.So, in order to make our lives infinitely more simple we are going to do three things: 1) Make an AVIsynth script file to import the videoTo import DirectShow footage into an avisynth file, use this command: DirectShowSource("C:\AMVExport\yourDVexport.avi",29.97)Obviously, you need to change 29.97 to 25 if you have made a PAL DV file. Saving the video stream:To make a copy that is easier to use than this DV file, open up VirtualDub and go to the Video menu and choose Fast Recompress. Next select Compression... and choose Lagarith from the list of codecs. When you have that selected then click the Configure button to set up the codec settings. For the settings uncheck "Enable Null Frames" and set the Mode to YV12. Now in the File menu choose Save as... (F7) As usual, choose an appropriate file name, and click save to make your file. This may be a couple gigabytes so
make sure you have plenty of space on your drive.
This will create a lossless Lagarith avi file for you to work from and the rest of the guides can be followed exactly as they are. One last thing, however, is to make a wav file of your audio stream. Exporting the AudioTo export an uncompressed wav from VirtualDub, while you still have it open, just go to file, Save Wav. Simple. That should be all - you will now be able to follow the rest of the guides exactly as they are and gain as good quality as you can get from Windows Movie Maker 2.
|