Exporting, compressing and multiplexing
your audio for distribution.
Exporting your Movie
First of all, as you should know by now, when you are
exporting your movie from your editing program you should always use
uncompressed PCM wav as your audio stream. Also, you shouldn't change
the sample rate - if you are using a 44.1kHz source then export it
as such. For this guide you should export your audio as a separate
wav. See the exporting guide for more info.
OK, this is where the guide will split into 3 parts:
1) Compressing audio for your DivX/XviD
2) Compressing audio for your MPEG-1/2
3) Compressing audio using higher
quality but less standard methods (Variable Bitrate, Ogg etc.)
Compressing
Audio for your DivX
AVI files can have numerous audio compression types
but for most of you the only one you need to think about is MPEG layer
3 audio.
Now, there is much speculation about the best mp3 encoder.
Like most of the mpeg specs, the quality varies per encoder although
every mp3 player can play back mp3 audio from any encoder. So, which
mp3 encoder is the best and where can you get them from?
Frauenhofer MP3 Codec - people call this the
"reference" mp3 codec that all others should be compared
to. I must admit, it is very very good - especially for constant bitrate
MP3s. There is a version of this codec supplied with Divx3.11a. However,
I think it's possibly been superseded by the LAME mp3 implementation,
which is what I recommend you use. If you want to use Frauenhoffer
then try installing the Divx3.11a codec and making sure it overwrites
all files. You will then be able to access it in virtualdub's audio
compression. However, if you want to take my advice, you'll use LAME
LAME MP3 - this is presently in my opinion the
best mp3 encoding option available. Even moreso because it's free
:) Although the codec is usually not designed for compression directly
in virtualdub there is an ACM implementation which is what we will
use to encode our audio. It is part of the AMVapp.
Quality Saving Tip - if you were using an mp3
as a source (shame on you :P) and made a wav file from it for editing,
you will be losing quality again when reencoding to mp3. If you can,
make sure that there is no silence at the start of your video (so
that the first frame of the video is the first frame of the audio)
then you can use the original mp3 file for the audio stream using
Nandub. See the next page for how to do
this.
Encoding your MP3 Audio in Virtualdub/Nandub
This method is very simple and involves importing your
wav audio to virtualdub and selecting Lame MP3 compression settings.
(You may need to download the AMVapp for
the LAME ACM MP3 codec)
For this conversion you will need to have the wav separate
from your video which, if you don't have already, you can do with
this guide or you can export
your audio separately in your video editing program. This is merely
to make sure that everyone is doing the same thing :)
Setup Options
You should ideally add your audio either during the
2nd pass of your DivX/XviD encode or by muxing it after. To mux the
audio after you have encoded the video, load your encoded video into
Virtualdub and in the Video menu choose "direct stream copy".
To compress you audio in Virtualdub, go to the audio
menu. Choose "Wav source..." and load the wav file of your
audio stream. Now choose Full Processing mode. Now choose "compression..."
Select Lame MP3 on the left. In the box on the right,
a long list of settings will appear. The first thing you should ask
yourself is what is the "sample frequency of my audio and is
it in stereo?". CDs are always 44.1KHz, dvds are 48KHz. There
is a problem that lots of people seem to have in Virtualdub with "Audio
Compression not possible" errors. So please read this carefully:
Virtualdub cannot encode something at 44.1kHz Stereo
if the source is 48kHz or mono etc. The reason you are getting the
error is because you are encoding the stream without converting the
input to match the selected compression type. So, make sure that you
select the right options for your input audio - if you have a 48kHz
stream then choose that as the encoding option.
It is possible to convert the audio in Virtualdub or
Nandub by Choosing Audio -> Conversion but I personally wouldn't
recommend it. The only time I could see conversion to be worthwhile
is if you have a 48kHz input stream and want to make sure people with
old soundcards can play it but to be honest, if they can't play 48kHz
audio then they probably can't play divxes. Converting upwards is
a waste of valuable bits, so don't do it.
In the Lame compression box you will see a list like
this:
44100 Hz, 320 kbps CBR, Stereo 40KB/s
44100 Hz, 256 kbps CBR, Stereo 32KB/s
44100 Hz, 224 kbps CBR, Stereo 28KB/s
44100 Hz, 192 kbps CBR, Stereo 24KB/s
44100 Hz, 160 kbps ABR, Stereo 20KB/s
44100 Hz, 160 kbps CBR, Stereo 20KB/s
...
44100 Hz, 128 kbps CBR, Stereo 16KB/s
44100 Hz, 124 kbps ABR, Stereo 16KB/s
These mean as follows: 44.1KHz audio at 320kbits per
second, Constant BitRate, Stereo. The eagle-eyed amongst you will
notice that there are ABR (Average BitRate) options. This is a "good
thing" and they actually work. I recommend choosing 160kbps ABR
but anything 128 or higher will be "ok". If you can do 192
or higher then that would be even better but it depends on how much
space you want to spend on your audio encode.
Interleaving - This is worth talking about briefly as
it designates how your audio will be 'joined' to the video. Audio
is separated and processed in frames just like video and for playback
it is best if they are interleaved. Check out the interleaving option
but the default setting of 1 frame is fine for this.
When you've set everything up, choose "Save as
Avi" and you're done.
Note: If when trying to compress your
audio in Virtualdub you notice that the Audio Stream stops at a few
kb, then you will need to go into Options > Preferences... then
choose the AVI tab and select Do Not Correct MPEG Layer III Audio
Streams. If this is not selected then the Lame encoder and Virtualdub
fight it out and you don't get any audio. Don't worry though, it will
all work well all the same.
Compressing
Audio for your MPEG 1/2
Most of you will be wanting to know about encoding audio
for MPEG 1 but this guide is also useful for MPEG2 stuff.
MPEG audio
For most people the choice of audio compression will
be no choice at all. Mpeg-1 layer 2 audio is what ErMaC recommends
in his guide and indeed it is the standard... you should never use
Mpeg1 layer 1 audio because it's seriously old and seriously crap
(it's pre-vcd which is pre 1993). So, mpeg1 layer 2 it is.
Mind you, it is possible to use MP3 audio in your mpeg
video files. The only problem with this is that they aren't compatible
with hardware playback - so vcds, dvd players and hardware mpeg players
will all have trouble with mp3 audio but in terms of playback in software
mode there is no problem whatsoever in using an MP3 stream for the
audio (except really really old pcs like P100s etc might get lagged).
[note - do not use mp3 for convention submissions
as they often use hardware players]
The choice is yours - I'll describe how to do good encodes
with both mp2 and mp3 audio but you need to decide whether you want
to have the video more compliant (which, if you are using ErMaC's
TMPGenc method it wont be anyway) or smaller/better quality audio-wise.
If you are doing an MPEG2 video file for a DVD master then you'll
have to choose mpeg layer 2 audio (unless you are DVD authoring where
you could possibly use WAV PCM but if you know much about authoring
then you know more than me already)
For this, the program used will be TMPGenc
which you should know about from ErMaC's guide.
mp2 - TMPG's audio encoding capabilities are
ok.. but they're nothing special. There is a better way to get quality
audio when encoding with TMPG using an addon program called tooLAME.
This is a simple .exe file that you can put anywhere on your computer.
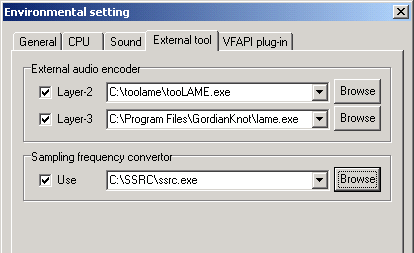
Once you've extracted it, load up TMPG and choose Options -> Environmental
Settings:

In the External Tool tab you can point TMPG to programs
that will do parts of the conversion for you. As you can see I have
external programs for layer-2 (mp2), Layer-3 (mp3) and sample rate
changing. The one you need is the Layer-2 (mp2) audio which you should
point to the tooLAME file you have extracted like I have done.
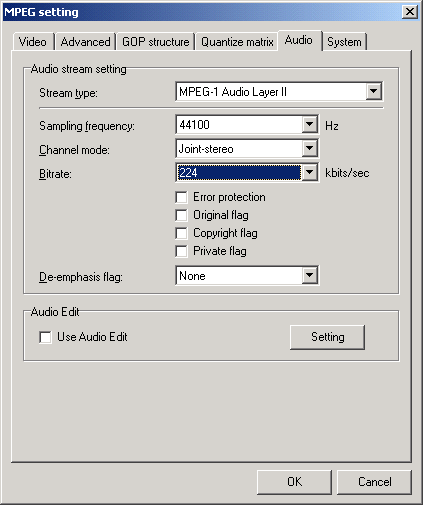
Audio encoding settings in TMPG are fairly simple and
the minimum quality settings I think you should choose are:

Of course, make sure the sample rate is the same as
your input file. If you think that Joint Stereo loses too much of
the stereo separation for you then by all means choose normal Stereo
for better sound. As for bitrate... well larger is better but for
mpeg layer 2 audio you don't really want to be going any less than
192. 128kbps may be ok for mp3s but it's not good for mp2 audio. 224kbps
is the standard for vcd audio so that's what I recommend. If you are
doing an MPEG2 DVD master of your video then don't skimp on the audio
- choose 384kbps.
That should be all you need to know for mp2 audio in
your mpeg file.
mp3 - TMPG doesn't have a default option for
mp3 encoding, you need to use an external compressing tool. Look at
the setup above for the TooLAME mp2 encoder and you will see that
I have a LAME mp3 encoder for layer 3 audio compression. This is what
you should do for mp3 audio. Get
the LAME mp3 stuff from here.
Extract the files into a directory on your computer
and then point to the LAME.exe from TMPG the same way as you have
done for tooLAME.
Again, the audio settings are the same as before except
now you can choose Mpeg1 Audio Layer III as your compression type.
So, again choose the correct sample rate and choose Joint Stereo (or
Stereo if you want that extra edge with the sound). For the bitrate
you should choose 128kbps or above. Personally I think 160kbps is
a good value for a reasonable quality/size ratio. If you can go higher,
please do ^_^ - if you do a 224kbps encode it will be the same size
as the layer 2 audio version but the quality will be much much better.
AbsoluteDestiny - October 2002
|